If you've ever built a page with a sticky nav or a table of contents sidebar, you've needed scroll spy. Most developers reach for Bootstrap or a library, but rolling your own gives you full control with zero overhead. In this post I'll walk through three approaches: Vanilla JS using the Intersection Observer API, a jQuery implementation using scroll events, and a React hook-based version.
What Is Scroll Spy?
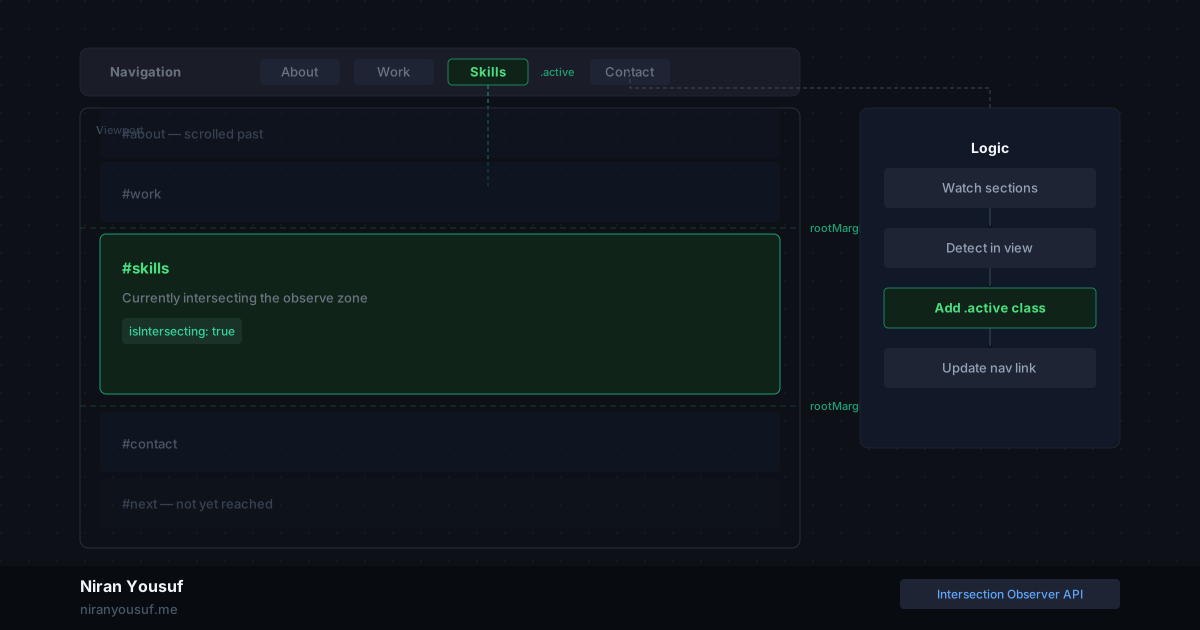
Scroll spy tracks which section of a page is currently visible in the viewport and updates the navigation accordingly, usually by adding an active class to the corresponding nav link.
The core logic is always the same:
- Watch the sections
- Detect which one is in view
- Update the nav link
Approach 1: Vanilla JS (Intersection Observer)
This is the modern, performant way. No scroll event listeners, no layout thrashing. The browser handles the heavy lifting.
HTML Structure
<nav>
  <a href="#about">About</a>
  <a href="#work">Work</a>
  <a href="#contact">Contact</a>
</nav>

<section id="about">About</section>
<section id="work">Work</section>
<section id="contact">Contact</section>
JavaScript
const sections = document.querySelectorAll('section[id]');
const navLinks = document.querySelectorAll('nav a');

const observer = new IntersectionObserver(
  (entries) => {
    entries.forEach((entry) => {
      if (entry.isIntersecting) {
        // Remove active from all, then set on current
        navLinks.forEach((link) => link.classList.remove('active'));
        const activeLink = document.querySelector(`nav a[href="#${entry.target.id}"]`);
        if (activeLink) activeLink.classList.add('active');
      }
    });
  },
  {
    rootMargin: '-40% 0px -55% 0px', // Triggers when section hits middle of viewport
    threshold: 0,
  }
);

sections.forEach((section) => observer.observe(section));
CSS
nav a { color: #999; transition: color 0.2s; }
nav a.active { color: #fff; font-weight: 600; }
Why rootMargin: '-40% 0px -55% 0px'? This shrinks the observable area to a horizontal band in the middle of the viewport. Without this, sections near the top or bottom of the screen fire the observer too early or too late.
Common mistake: Using
threshold: 1. This only fires when 100% of the element is visible, which breaks on tall sections that are taller than the viewport.
Approach 2: jQuery (Scroll Event + offset())
If you're working on a WordPress project or a legacy codebase, jQuery is often already there. This approach uses the classic scroll event.
$(window).on('scroll', function () {
  const scrollPos = $(document).scrollTop();

  $('section[id]').each(function () {
    const sectionTop = $(this).offset().top - 100; // 100px offset for sticky nav height
    const sectionBottom = sectionTop + $(this).outerHeight();

    if (scrollPos >= sectionTop && scrollPos < sectionBottom) {
      $('nav a').removeClass('active');
      $(`nav a[href="#${$(this).attr('id')}"]`).addClass('active');
    }
  });
});
Debounce for Performance
Scroll events fire extremely frequently. Wrap the handler in a debounce to avoid performance issues:
function debounce(fn, delay) {
  let timer;
  return function () {
    clearTimeout(timer);
    timer = setTimeout(fn, delay); // Only runs after scrolling stops
  };
}

$(window).on('scroll', debounce(function () {
  // same scroll logic here
}, 10));
Note: The
offset()approach works well but can be inconsistent with dynamic content or sticky headers. Always account for your navbar height in the offset value.
Approach 3: React (useRef + useEffect + useState)
In React, avoid manual DOM manipulation. Use refs for section elements and Intersection Observer inside a useEffect.
Hook: useScrollSpy.js
import { useEffect, useState } from 'react';

export function useScrollSpy(sectionIds, options = {}) {
  const [activeId, setActiveId] = useState(null);

  useEffect(() => {
    const observer = new IntersectionObserver((entries) => {
      entries.forEach((entry) => {
        if (entry.isIntersecting) {
          setActiveId(entry.target.id); // Update active section id
        }
      });
    }, {
      rootMargin: '-40% 0px -55% 0px',
      threshold: 0,
      ...options,
    });

    sectionIds.forEach((id) => {
      const el = document.getElementById(id);
      if (el) observer.observe(el);
    });

    return () => observer.disconnect(); // Cleanup on unmount
  }, [sectionIds]);

  return activeId;
}
Usage in Component
import { useScrollSpy } from './useScrollSpy';

const sections = ['about', 'work', 'contact'];

export default function Nav() {
  const activeId = useScrollSpy(sections);

  return (
    <nav>
      {sections.map((id) => (
        <a
          key={id}
          href={`#${id}`}
          className={activeId === id ? 'active' : ''}
        >
          {id.charAt(0).toUpperCase() + id.slice(1)}
        </a>
      ))}
    </nav>
  );
}
This keeps the scroll logic completely separate from your UI. The hook is reusable. Drop it into any project.
Which Approach Should You Use?
| Scenario | Best Approach |
|---|---|
| New project, no framework | Vanilla JS (Intersection Observer) |
| WordPress / legacy project | jQuery with debounce |
| React / Next.js project | Custom useScrollSpy hook |
| Need IE11 support | jQuery (IO has no IE support) |
Browser Compatibility
- Intersection Observer: All modern browsers. No IE11 support. Use a polyfill if needed.
- jQuery scroll: Works everywhere jQuery does.
- React hook: Depends on IO — same modern browser requirement.
Scroll spy is one of those things that feels complicated until you see the pattern once. After that, you'll write it from scratch in under 10 minutes. Pick the approach that matches your stack and adjust the rootMargin values to fit your layout. That single tweak makes the biggest difference in how natural the active state feels while scrolling.